Blog

UX/UI the obstacle in finding product-market fit

Since we started appssemble in 2016 I’ve worked with a lot of founders on their digital products. During this period I noticed that a lot of founders fail to find the product-market fit and scale their products. This is usually because of running out of money and they haven’t iterated their product enough to find the market fit.

There are a lot of mistakes that founders make. Two of the most prominent ones are building something that customers don’t need and focusing too much on the way the product looks like. Those two are linked as if you’re a founder you don’t know your customer and its needs you’re going to build something based on assumptions. Instead of building a business, they are building an art project.

The best way I found to explain this concept is by using Dan Olsen’s Hierarchy of Web User Needs as this can be applied to any user-facing software product. Below, you’ll find a modified version, based on Olsen’s adaptation of the Maslow pyramid of needs.

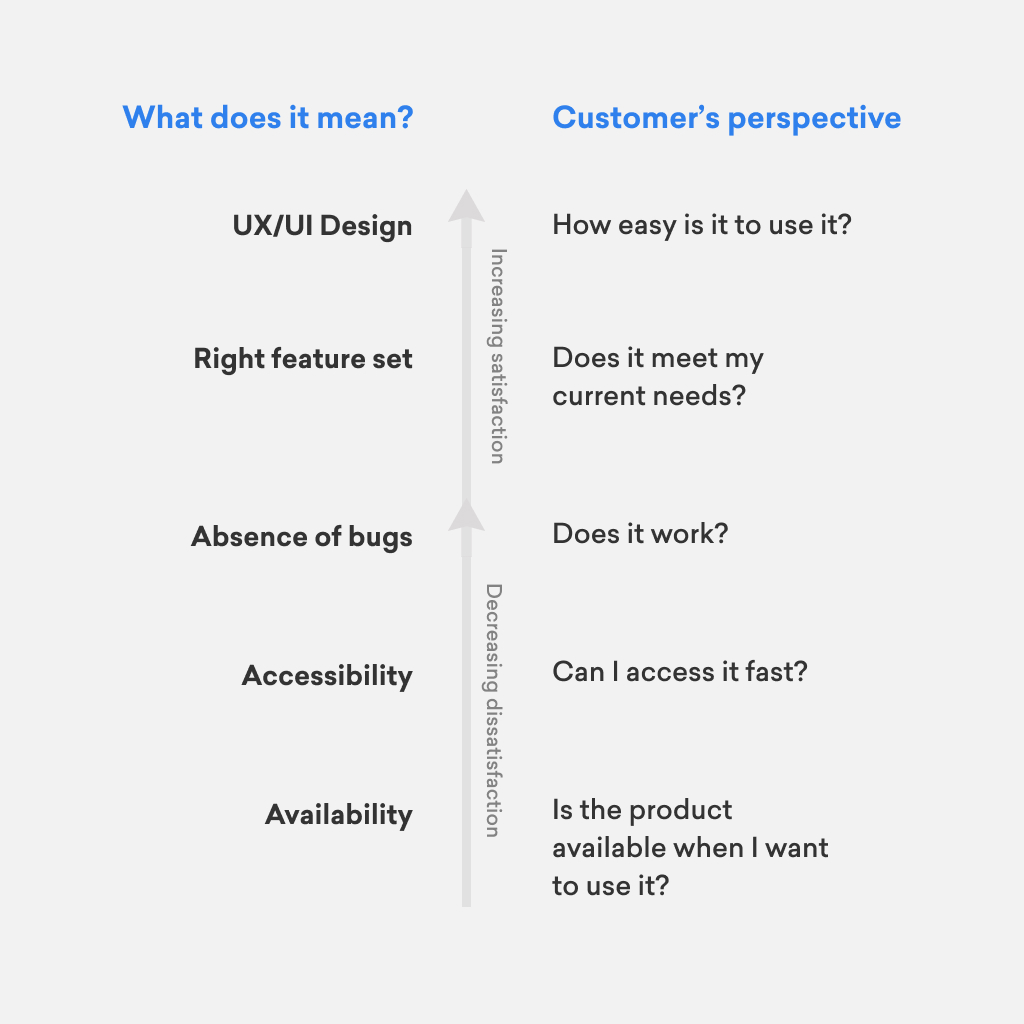
Like in Maslow’s pyramid of human needs if the base of the pyramid is not fulfilled is irrelevant to focus on the top layers. If you’re hungry and you don’t have where to leave you won’t bother with self-fulfillment. This is also true for digital products, besides the cornerstone, the technical ones — availability, accessibility, and stability, the most vital aspect for the user is the right feature set. While the cherry on top is the UX/UI is redundant to think about it before having the product-market fit.

Why focusing on UX/UI might kill your startup?

  1. You’ll develop more features than needed — costly and decreases the extensibility of the product
  2. Eye-candy designs — pricy custom components, users will have to learn new behaviors
  3. Won’t help the process of finding the product-market fit — increased time to market

More, unnecessary features 

The vast majority of first-time founders build digital products on a foundation of personal observations and assumptions. Going into the design phase, a lot of questions are being raised (about user paths, functionalities, screen estate, etc.), this leads to adding a lot of nice to have features to the product, because “it looks good”, “it’s better for the user experience”, or frequently because “TikTok/Instagram/Facebook/{Famous app} does it, we should too”.

This affects the MVP in numerous ways, but the most important one is that more features are going to be developed. From a technical point of view, the added complexity will result in lower extensibility and flexibility of the MVP — which are the most important elements in finding the product market fit. Secondly, it will make the founder focus on the wrong things when talking to the customer, instead of asking questions about the core feature, they would spend a lot of time discussing secondary, nice to have additions.

Custom components and behaviors

When building a product, its goal is to make life easier for its users. First-time founders come with a lot of ideas on how to make an eye-candy design and complex user interactions. They generally don’t want to use interactions that are well known and used through popular apps, as they will make their new product “too similar” to other products which don’t even operate in the same space as theirs. This leads to spending a lot of money on complex UI components and implementing a product that will probably need a tutorial or walk-through on how to use it.

The cost of developing custom UI components and reinventing the wheel can take up to 50% of the total cost of a software project based on my experience. Additionally, modifying those will also cost more, so future iterations will also suffer because of this.

Moreover, new, complex user interactions will require more time for first-time users to understand the product and actually be successful in completing its task with it.

Product-market fit

Implementing a complex, custom-made UX/UI design won’t make the founder’s job of finding the product-market fit easier either. Besides spending time on whistles and bells, a custom, complex UI design will also affect the time-to-market. It is much cheaper and faster to implement, launch and iterate a product that focuses only on the core feature and doesn’t have any advanced UI/UX designs. 

So instead of spending months and a lot of money on implementing something that doesn’t solve a real problem but looks good, it’s more advisable to launch as soon as possible, with a limited feature set and designs, and rework that till the market fit is found at the same cost.

But users won’t use my product if it’s ugly!

The user experience is one of the most important parts of a software product, however, there is a mismatch between what customers and founders view to consider a good user experience. In my experience, a good amount of founders focus too much on the user interface aspects of the product while ignoring the customer’s needs.

Let’s take an example, let’s say every day when you go to work, you would have to validate a parking ticket on a vending machine that is far away from the place you usually park. Instead of walking for 10 mins to validate wouldn’t you rather use a mobile app that’s boring from a UI perspective but gets the job done?

The same argument can be made for apps that live completely in the digital space, people use your product for how it helps them solve a specific need, only secondly for the way it looks. Minecraft, for instance, doesn’t have any advanced graphics but, tens of millions of people play it.

The UX/UI of a digital product is important for its success, but, I found out that in the vast majority of cases, products that are not defined and haven’t found the product market fit can be an obstacle in building a great product.

So what should you do?

If you’re a founder with a huge budget, going out and building a good-looking product would definitely help you gain more users, yet, if you don’t have a lot of resources, your first customers (the early adopters) don’t care about the UI, they care more about solving a specific problem. 

Everyone who builds a new product should focus on the core functionality and on solving a real problem, not trying to convince the users to use a sub-par product because of its UI. There are cases where a better user experience is the actual product, for those situations you should invest into making the user experience as nice as possible for the user, but usually, this is also reflected in the future set, rather than on how it looks. 

Let’s take an example, you are using 2 food delivery apps that both have the same restaurants and dishes available, would you use the one that accepts digital payments in favor of the other one that might have a better UI? I would, I don’t care how it looks like as long as it gets the job done and I don’t have to worry about not having enough cash.

I’ll even go further and say that if you manage to build a product that is not eye candy but has to pay users you’ve definitely found the product-market fit and you can build a business around it because you found something people want regardless of how it looks like. After all, this is the whole point of building a startup.

A guide to writing your own iOS CI/CD integration script

If you are working on a relatively big mobile project, most definitely you are going to need a CI/CD pipeline for building your application and distributing it to your testers. There are many tools which can be easily used for setting up this pipeline, the most popular one being Fastlane (https://fastlane.tools). While those tools are easier to use, I think is important to understand what happens under the hood and how can we create a CI/CD pipeline using the tools provided by Apple.

The idea of a CI/CD pipeline is to have a device that is able to build, test and distribute your app. Complex pipelines can be set up based on the branching model ensuring that the development branch compiles and all the tests run, however this is meant for another article as today we are only focusing on creating a CI/CD bash script that will: build, test, gather coverage data and distribute our application via Fabric.

In order to build the application we firstly need to fetch it from our repositories, usually this is done with a Git or SVN command or commit hooks, this really depends on the versioning system you are using for your project.

After the project is fetched on the build machine, we would need to make sure that all the third party dependencies are also fetched (if there are any). One of the most common tools used for managing the external dependencies of an iOS project are CocoaPods, so if you are using it, the first thing you should do in your script is what you would normally do on your machine when adding new libraries; fetching and installing those.

After all the external libraries have been installed, we would need to build the app and run the embedded tests. In order to do so we would use the Xcode command line tools, which is also used by Xcode in order to build the iOS application. The tool can be accessed from the terminal under the name “xcodebuild”.

In order to test that everything is installed correctly and see all the targets, schemas and build configurations of the current project the following command can be used

xcodebuild -list -project <your_project_name>.xcodeproj

So, lets get down to business, how can you run and test the project?

xcodebuild has many possible configurations and flags, all of them can be checked by reading Apple’s documentation or by looking in the manual:

Since we have mentioned CocoaPods in the begging of the article the application we are trying to compile should be a Xcode workspace, however the same steps can be applied in the case of an Xcode project as well.

Ok, so the above command looks scary, it has many parameters, but we’ll go trough each one of them:

  • workspace — specifies the name of our workspace
  • schema — the schema to be used for building (can be obtained from the “xcodebuild -list -project <your_project_name>.xcodeproj” command). A project can have multiple schemas, for instance an Apple Watch one, by using this param, we can specify which one we want to build against.
  • configuration — the configuration of the project (can be obtained from the “xcodebuild -list -project <your_project_name>.xcodeproj” command)
  • destination — this is used to specify for what kind of device you want to build your application for, it can be used for specifying a real device, if you have one attached to your build machine, or for using a certain simulator (with a desired OS version and device type)
  • derivedDataPath — used for specifying another path for derived data folder, this is useful if you want to use any files created while your app was built
  • BUILD_DIR — is used for specifying the executables and the build products should be put once the build is done, this as well as the derivedDataPath can be omitted if your requirements don’t need them
  • UseModernBuildSystem — Xcode 10 has a new build system and in order to force the build process to use the new or legacy one this flag can be used.
  • clean — is used for cleaning previous build products
  • build — builds the specified target
  • enableCodeCoverage — Used for specifying weather or not the coding coverage should be collected when running the tests
  • test — runs the tests for the specified target

After this command has ran, we should have all the build products in the specified folders. The coverage report is an encoded file which is accessible in the derived data folders under the name “Coverage.profdata”, however this file does not have an readable file format, so if you want to use it for feeding those details into an external service for monitoring the codebase health, or you just want to read it yourself, you need to convert it.

In order to convert the Coverage.profdata file to a readable format another tool should be used, specifically xcrun.

xcrun is another tool from the command line toolset, its purpose is to find tools and to execute them. The tool we are interested in is llvm-cov it’s purpose is to show “code coverage information for programs that are instrumented to emit profile data”. In the converted file we want to be able to see the coding coverage for every line of the project, in order to do so we will use the show command of the llvm-cov tool — “The llvm-cov show command shows line by line coverage of the binaries BIN”.

The show command takes 2 parameters, the path to the Coverage.profdata file generated by the build command as well as binary obtained as a result of the build command (this is usually located in the <your_app_name>.app package under the name <your_app_name>).

So to recap, we build the application, we have ran the tests and we have converted the coding coverage data into a readable format. Next, we need to distribute the application via Fabric, but before we are going to do this, we need to create an archive and to sign it with the correct provisioning profile.

If you are reading this, you might probably be familiar with the way iOS applications are distributed in the AppStore, otherwise, you should read this.

In order to sign an application via the command line tool you need a development/distribution certificate, the name of the provisioning profile you want to use for signing and a .plist which specifies the export options for the archive.

The development/distribution certificate can be obtained from Apple’s developer’s console and it should be “installed” on the build machine. By installed I mean added into a keychain, aaand here comes the fun part 🙃 If you are plan to use your CI/CD shell script on a remote Mac machine which will be accessible via an automation software such as Jenkins the default keychain (login) might not be accessible by the automation software, so in order to solve this issue a new keychain must be created. (If you just want to test it on your machine, ignore the keychain part and jump directly to the creating of the archive)

The idea is the following:

  • create a new keychain which stores the development/distribution certificate
  • before creating the archive, set the default keychain of the system to the newly created one
  • unlock the keychain — so that the certificate can be used by the signing process
  • creating the archive and sign it
  • reset the keychain to the default one

So let’s get down to business, in order to create a new keychain the keychain access app from the mac can be used File -> New keychain… and follow the steps. After the keychain has been created, the development/distribution certificate should be added in this keychain (drag and drop the certificate in the newly created keychain in the Keychain Access app).

Now back to our build script, we have a new keychain which contains the certificate needed for the signing of the application, now we need to make this keychain the default keychain of the system. All the keychain manipulation will be done using the “security” tool which is already installed on every MacOS.

After we have set the new keychain as the default one, we need to unlock it so that the certificate is available for signing, this can be easily achieved with the following command:

After this step, we can resume our archive creation process. We will use the same xcodebuild command with which we are already familiar

The new parameters used are:

  • archivePath — specifies the location in which the generated archive will reside
  • PROVISIONING_PROFILE — the name of the provisioning profile used for signing
  • archive — creates an archive from the specified target

The output of this command will be the archive of the project, however in order for this archive to be usable for submitting it to the AppStore or internal testing, this needs to be exported and signed.

For the export process a .plist file with the export options should be used. This file can be generated by creating and exporting an archive from Xcode:

  1. Open your project in your local Xcode
  2. Archive the project
  3. Once the archive is done, export the generated .xcarchive file into an IPA file. Xcode will copy the used Export Options plist file next to the generated IPA file
  4. Copy the export file to the build machine

The contents of the plist file are the ones presented above, the export file specifies weather or not bitcode should be enabled, the distribution method, the provisioning profiles used (the name must match the <the_name_of_the_provisioning_profile> used when generating the archive), and other options such as strip symbols and weather or not to use app thinning.

After this step, we are ready to generate the .ipa file. As you probably already know, we are going to use the xcodebuild command for this as well:

  • exportOptionsPlist — specifies the path of the export options file (the file above generated)
  • exportPath — the path where the output (the .ipa file) of the export will reside

🎉 after this step we should have an .ipa file which can be used for distibution, however we still have some cleaning up to do.

We need to reset the keychain to the old login keychain.

security list-keychains -d user -s <path_to_the_old_login_keychain> <path_to_the_new_keychain>
security list-keychains -s <path_to_the_old_login_keychain>
security default-keychain -s <path_to_the_old_login_keychain>

The only thing left to do is to distribute the application. For the purpose of this walk trough, we are going to distribute it via Fabric. In order to do so, we can use their own tool which was dowloaded by the “pod install” as an external library and placed in the Pods folder.

In order to submit the archive for distribution the Crashlytics submit tool should be used.

This tool will upload the generated .ipa file to Fabric and will email all the testers from the specified group that a new build is available.

Hopefully this short walktrough has made you aware of the complexity of the distribution process and has shed some light on how you can implement your own CI/CD shell script.

The whole script can looks as this, this can be used into an automation tool such as Jenkins for building your app 🙂

# Install external dependencies
pod install
# Build and run tests
xcodebuild -workspace <your_project_name>.xcworkspace \
-scheme <your_desired_schema> -configuration <your_desired_configuration> \
-destination 'platform=iOS Simulator,name=iPad Pro (12.9-inch),OS=10.2' \
-derivedDataPath <derived_data_path> BUILD_DIR=<build_directory_path> \
-UseModernBuildSystem=YES clean build -enableCodeCoverage=YES test
# Convert the coverage report to a redable form
xcrun llvm-cov show -instr-profile <path_of_the_Coverage.profdata_file> \
<path_of_the_executable> > <name_of_the_report_file>
# Set the default keychain to the new one
security list-keychains -s <path_to_the_new_keychain>
security default-keychain -s <path_to_the_new_keychain>
# Unlock the keychain
security unlock-keychain -p <my-super-secret-password> <path_to_the_new_keychain>
# Archive the project
xcodebuild -workspace <your_project_name>.xcworkspace \
-scheme <your_desired_schema> -archivePath <path_of_the_archive>\
-configuration <your_desired_configuration> \
PROVISIONING_PROFILE=<the_name_of_the_provisioning_profile> \
archive -UseModernBuildSystem=YES
# Export the archive
xcodebuild -exportArchive -archivePath <path_of_the_archive> \
-exportOptionsPlist <path_of_the_export_plist_file> \
-exportPath <path_of_the_exported_archive_location> -UseModernBuildSystem=YES
# Reset the keychain
security list-keychains -d user -s <path_to_the_old_login_keychain> <path_to_the_new_keychain>
security list-keychains -s <path_to_the_old_login_keychain>
security default-keychain -s <path_to_the_old_login_keychain>
# Distribute the app via Crashlytics
Pods/Crashlytics/submit <id-of-the-fabric-organisation> \
-ipaPath <path_of_the_exported_archive_location>/<your_project_name>.ipa \
-groupAliases <the_alias_of_the_testing_group>
view raw build-script.sh hosted with ❤ by GitHub

See you next time, happy coding!

UIWindow, rootViewController, visual artifacts and leaks.

Hello 👋

Today I am going to talk about UIWindowrootViewController and some of its quirks, namely how you can create leaks in your app by incorrectly using them.

My relationship with UIWindow is not that serious as the one with the WKWebKit, nevertheless we have some issues.

The task we tried to complete was straightforward, refactor the navigation between screens in an old application. Our approach was to start use Coordinators Pattern, and split the old codebase into multiple flows, each one responsible for a certain part of the application (Login, Feedback, Profile, etc.).

All this looked great on 📝 , so we started to implement it, needless to say that the codebase was poorly written and the navigation was splattered all over the view controllers in all sorts of bizarre extensions.

One common thing the old developers did, was manipulating the rootViewController of the UIWindow, and this one started creating us problems.

We all know that the refactoring process of an application is something which is time consuming and that the business doesn’t necessarily see the value in doing that, but thats another topic of discussion maybe for another post. What we tried to do was to implement the Coordinators Patterns only on certain flows of the application while leaving the rest of them to work as they did previously, meaning that we would have to make our flows work with the perviously existing UIWindow manipulation in place.

The problem wasn’t visible till we started presenting a view controller which had an alpha value of 0.5 which meant that it was transparent, and the view behind it was visible. That view controller was presented by replacing the root view controller of the current window.


let startupViewController = StartupViewController()
let navController = UINavigationController(rootViewController: startupViewController)
        
appDelegate.window.rootViewController = navController

What we have observed is the although the root view controller of the current window was changed, and the top view controller was the correct one (the transparent one) the old one was still visible under it.

Opening the UI view inspector did not help either, as both views were presented there as well. Our next step was trying to see who has a reference to that view controller and where is it displayed. We have started up the memory graph debug tool and we have found out that there are memory leaks, we had objects which weren’t deallocated as we expected them.

So, what happens?

We have tracked the issue to the way UIViewControllers were presented. If the previous rootViewController (or any of its children, or any other contained UIViewController if the root was a UINavigationController) had any UIViewControllers presented while changing the root of the window, those would not be deallocated and will still be visible.

What we end up doing in our project due to alpha on some view controllers and to they way screens were presented, was replacing the whole window with a new one and dismissing all the view controllers from the old one.


let newWindow = UIWindow(frame: UIScreen.main.bounds)
newWindow.rootViewController = rootViewController
        
UIWindow.transition(with: appDelegate.window, duration: 0.3, options: .transitionCrossDissolve, animations: {
    let oldWindow = appDelegate.window
            
    appDelegate.window = newWindow
    newWindow.makeKeyAndVisible()

    oldWindow?.rootViewController?.dismiss(animated: false, completion: nil)
  
  }, completion: nil)

Dismissing the calling dismiss on the root view controller will dismiss “its immediate child view controller and all view controllers above that child on the stack.

And on that bombshell, see you next time and till then make sure to call dismiss on the presented view controllers so that other developers who come after you won’t have to waste their time trying to comprehand what happens.

💻📱

WKWebView and WKCookieStore in iOS 11

Today I am going to talk about the new WebkitView in iOS 11 and about our love/hate relationship.

The project I worked on was a simple iOS application which should provide a native component for login/signup, navigation, and use a web view to display his website and all the other features which were provided via the web page.

At first this task seems trivial and most probably there are many of you who already did it. However, not many of us implemented this on the iOS 11, using the latest tools provided by Apple and here I’m referring to the WKWebView with all its additional properties.

What I’m going to expose here are some least know features, or not clear from Apple’s documentation, or things we’ve struggled with while implementing this project.

The task is simple, set cookies on a webpage (so we know that the user is logged in), do some CSS manipulation on all pages (basically hide the navigation bar of the site and some other components) and add some custom JS so we know when the user navigates within an iframe.

So lets get started with it 💻

Cookies

The first task is to add some cookies to the WKWebView so when we fire any request to have those in place. Previous to iOS 11, the cookies used by the app would be shared and stored in the NSHTTPCookieStorage . UIWebView would use cookies from this cookie storage (parent app cookie storage).

All of those has changed with the introduction of WKHTTPCookieStore. Starting with iOS 8 we have a new component for displaying web content in our iOS apps, namely WKWebView.

iOS 11 came with some changes and added some extra features to the WKWebView, basically each WKWebView now has its own cookie storage and its not share by the whole app and all other web views like in the case of (UIWebView).

To add cookies to a WKWebview we can use the cookie store WKHTTPCookieStore which has a set of methods for cookie manipulation, setCookiegetAllCookies and delete cookie.

All of those methods work with a completion handler which gets called after the operation was made. All those operations are async operations and SHOULD BE CALLED FROM THE MAIN THREAD. The documentation for this is kind of thin and we haven’t found it to be written anywhere.

All those methods work with objects of HTTPCookie objects. The initialisation of those objects is pretty straight forward and we won’t cover it.

Another interesting thing we found is that those calls don’t always succeed, and what I mean by that is that the completion handler is not always called, event if those methods are called from the Main thread and this is not blocked by any operation.

We found this behaviour to be pretty odd and we couldn’t find any documentation for it as well. This approach worked for when we first displayed the WKWebView, but when we would display it the second or third time, the setting of the cookies would fail.

Initially this broke our code as we relied on the completion handler of the setCookie to be called at some point, but it didn’t so after a few hours of trying different approaches and scrapping the web for answers we have found a StackOverflow hint.

The solution was to use a shared WKProcessPool object between all the WKWebViews used in the app. WKProcessPool states where the cookies should be saved, so by using the same pool, we have found out that the get, save and delete methods on the shared cookie storage work properly.

Hope this will save you some time. We found out that Apple’s documentation in are of WebKit is pretty scarce and thats is the main reason why we have a love/hate relationship.

CSS manipulation

In the app we build the target was from start iOS 11, which meant we could use all the new 💎 things (WKWebView and WKHTTPCookieStore).

First of we have to initialise the WKWebView before we start using it, in order to do that we would need an instance of WKWebViewConfiguration, which is a collection of properties used for configuring the WKWebView. This configuration is responsible for determining how soon a page is rendered and many other options.

This configuration object will be used for CSS manipulation. We want some CSS to be applied to the web pages before they are displayed on the screen, we want the header of our website stripped hidden in the web view presented in the app.

There are many properties on this configuration object, but the one we are most interested in for fulfilling the above stated task is the .userContentController property. WKUserContentController is an object which allows the user to inject JavaScript code in the web view.

The whole idea is the following, write some JS script that will append a CSS to the current HTML document structure and execute that when the web view loads.

The JS script for achieving this is the following:

var styleTag = document.createElement("style");
styleTag.textContent = 'header { display: none;} ';

document.documentElement.appendChild(styleTag);

We create a new style tag, we populate it with our custom CSS, in this example “header { display: none;}” for hiding the header element. You can place here any CSS code, in order to fulfil your desired behaviour. The last line adds the tag as a child tag to the current HTML document.

Now that we have all the elements, lets stick them together, we need to initialise a WKWebView, add the script and load a page.

The following code, does exactly that:


        let wkWebConfig = WKWebViewConfiguration() // We create a web view configuration
        let wkUserController = WKUserContentController() // We create a user content controller for adding the JS for manipulating the CSS of the web page
        
        wkWebConfig.userContentController = wkUserController
        
        addHideHeaderScript(wkWebController: wkUserController) // We add the the hide header script
	// We configure the web view, and add it as a subview to the current view
        webView = WKWebView(frame: self.view.bounds, configuration: wkWebConfig)
        webView.navigationDelegate = self // adding the delegate for receiving navigation callbacks (weather a page has loaded or an error occured)
        
        view.addSubview(webView)
        
        webView.autoresizingMask = [.flexibleWidth, .flexibleHeight]
    }

    private func addHideHeaderScript(wkWebController: WKUserContentController) {
        // Add hide header bar script
        let scriptURL = Bundle.main.path(forResource:”name_of_the_script_file”, ofType: "js") // finds the path for the JS file
        let scriptContent = try! String.init(contentsOfFile: scriptURL!) // loads the content of the file into a script
	// Creates a WKUserScript object, with the contents of the .js file, and injects it .atDocumentStart 
	// (injects the script after the document element is created, but before any other content is loaded)
	// the element should be applied to all frames of the web page not only to the main one
        let script = WKUserScript(source: scriptContent, injectionTime: .atDocumentStart, forMainFrameOnly: false)
        
	// add the user defined script to the user content controller of our WKWebViewConfig
        wkWebController.addUserScript(script)
    }

After calling the “configureWebView” method, the we can start loading pages using the load method of the WKWebView.

JS callbacks in Swift

The next step it is to add the a script which would notify us when a page on an iframe changes. Unfortunately the .navigationDelegate of the WKWebView doesn’t notify us regarding the changes in the iframes of a web page.

To achieve this behaviour we will use once again JavaScript, the process is similar to the one used before, but also has a little twist. We want a Swift callback every time the web page navigates to a new link, previously we have seen how we inject JavaScript into a web page (Swift -> JavaScript), but we haven’t talked about the backwards communication, JavaScript -> Swift.

In order to receive callbacks from JavaScript we need to implement the WKScriptMessageHandler protocol which has only one method

func userContentController(WKUserContentController, didReceive: WKScriptMessage)

This will be called every time our JS code posts a message back to the Swift code.

So how do we use it?

The process is very similar to the one used before

  1. Create a .js file for the JS code and populate it with the custom code which will notify the Swift code base when a certain event occurs
window.onhashchange = function () { window.webkit.messageHandlers.notification_name.postMessage('pageHasChanged');}

The previous code does the following, every time the window has change function is called from the HTML we post a message to the webkit with the identifier “notification_name” and some message, in this example “pageHasChanged”,

2. Add the JS and the delegate

 private func addPageHasChangedDelegateScript(wkWebController: WKUserContentController) {
        // load the script from the file and create a WKUserScript object
        let scriptURL = Bundle.main.path(forResource: Constants.detectPageChangeScript, ofType: "js")
        let scriptContent = try! String.init(contentsOfFile: scriptURL!)
        let script = WKUserScript(source: scriptContent, injectionTime: .atDocumentStart, forMainFrameOnly: false)

	// Add the script to the WKUserContentController 
        wkWebController.addUserScript(script)

	// Register for receiving callbacks from javascript for a notification name 
        wkWebController.add(self, name: ”notification_name”)
 }

3. Implement the delegate method

 func userContentController(_ userContentController: WKUserContentController, didReceive message: WKScriptMessage) {
        if (message.name == “notification_name”) {
            print("Page changed")
        }
    }

As you probably saw, its important to use the same identifier in both JS and Swift code for a certain notification, in this current exampleiOSiOS 11WkwebviewWkcookiestorageWkprocesspool that identifier is “notification_name”.

That’s it, if you are interested in other cool features of the WKWebView I strongly encourage you to watch the following WWDC video.

Happy coding!📱